Panels get the glory; hardware decides the outcome. The same PET panel can be a permanent, high-performing wall feature or a rattling disappointment — depending on what holds it. Yet fixings are the most neglected line in acoustic quotations: buyers who agonize over felt density accept “adhesive (by others)” without a second look. This guide covers the standard fixing families, how to match them to substrate and project goals, and the accessories that turn a panel shipment into a complete installation kit.
The four fixing families, revisited for buyers
Adhesives are the fastest and cheapest route — and the least reversible. Specifier-grade choices are MS-polymer or PU adhesives rated for both panel and substrate; solvent-based contact adhesives need compatibility testing on PET felt and belong to trained crews. Buy by coverage rate (liters per square meter), not by price per tube, and specify full bead patterns rather than dots to avoid telegraphing through thin felt.
Z-clips (French cleats) pair an aluminum rail on the wall with a mating rail on the panel. They cost more in hardware and setup but deliver three buyer-critical properties: removable panels (service access, relocation), a slight stand-off that aids low-frequency absorption, and no adhesive chemistry to argue with. They are the default for corporate projects with demountable partitions.

Impaling clips — sharp pins bonded to the wall that pierce the panel back — suit heavy, permanent installations on masonry or backed drywall. Strong and invisible, they demand substrate planning and are strictly one-way.
Battens and sub-frames do double duty: they carry panels and create the air gap that upgrades low-frequency absorption. Timber battens at 400–600mm centers are the classic; metal furring suits fire-rated programs. For wood slat systems, engineered sub-frames with standardized fixing details are what make factory product and site carpentry meet cleanly.
Matching hardware to substrate and goal
The selection logic is a two-question matrix. Substrate: masonry and concrete accept everything; drywall demands blocking or fixings that reach studs; demountable partition systems require their own clip families. Goal: permanent (adhesive/impale), serviceable (z-clip), performance-first (batten cavity), or rental-grade demountable (freestanding feet, hook systems). A five-minute conversation about these two questions prevents the classic failure: perfect panels, wrong glue, peeling felt in a south-facing corridor two summers later.
The accessories that complete the kit
Professional installations are won in the accessories list, and distributors who ship them with the panels remove the last excuse for improvisation:
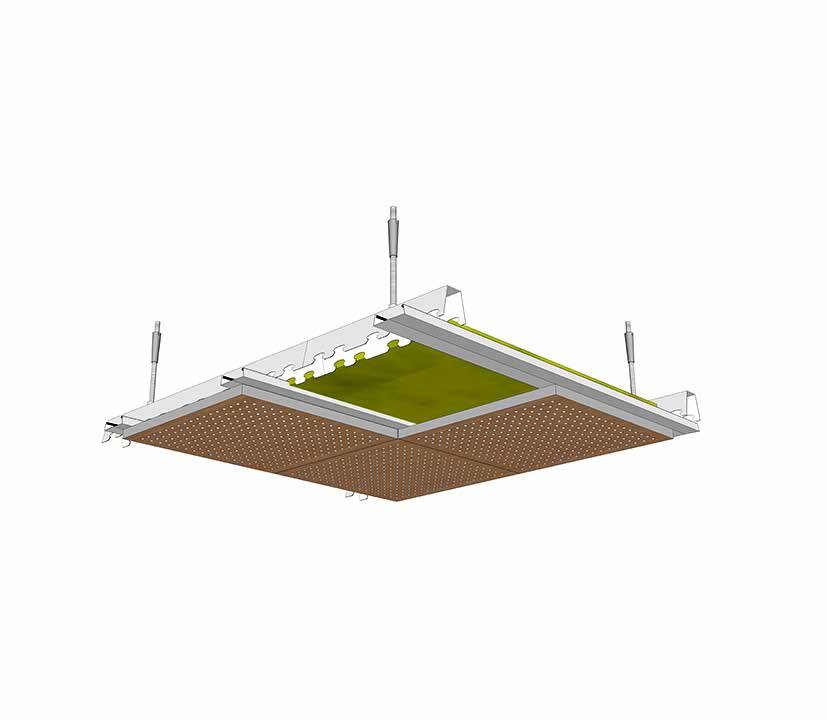
- Suspension hardware for baffles and clouds — cables, anchors and the ceiling-fixing certifications some markets require.
- Edge trims and profiles that finish panel perimeters on exposed edges and junctions.
- Touch-up and sealant kits matched to veneer and felt colors — small items that rescue phase-two additions and site nicks.
- Layout drawings and fixing schedules — not hardware, but the accessory that reduces site questions to zero.
Supply-chain notes for buyers
Hardware is where mixed orders quietly succeed or fail. Three disciplines keep containers complete: consolidate fixings with the panel order (one source, one packing list, matched colors on trims); specify by part number and quantity per square meter in the contract, not “as required”; and demand the fixing schedule with the shop drawings before production, because retro-engineered hardware lists are where lead times go to die.
Panels are bought once; hardware is lived with for the life of the fit-out. Quote it explicitly, supply it completely, and the installation — and the relationship — holds as firmly as the panels do.
Choosing Between Them: A Decision Framework
The right fixing follows three questions. Will the panel ever need to come down – for services access, relocation, or reconfiguration? If yes, mechanical systems are mandatory; adhesive commits the wall permanently. Is the substrate reliable? Adhesive bonds only as well as the paint or plaster it grips, so painted masonry and old plaster demand either mechanical fixing or substrate preparation that costs more than the fixings would. And who installs? A fit-out crew with a nail gun and a level fits rails in minutes; a maintenance team with no fixing experience does better with a peel-and-stick product designed for exactly that user. Matching the system to the installer prevents most of the failures that get blamed on the panel itself.
Budgeting completes the picture. Adhesive is the cheapest line item per square metre but carries hidden costs: surface preparation time, zero reversibility, and the wall repair bill at end of life. Z-clips cost more in hardware and slightly more in labour, and repay it in demountability and reusability across fit-out cycles. Direct mechanical fixing – screws with decorative caps through the panel – sits between, fast and permanent but leaving visible points. For most commercial projects, the calculation favours Z-clips or rail systems wherever the wall is part of a space that will change; adhesive wins in permanent applications on sound substrates where absolute flushness matters.
Common Failures and How to Avoid Them
Field failures cluster into a short list, all preventable. Panels dropping after months: traced to adhesive applied in cold conditions or to dusty surfaces – fix by conditioning adhesive and panels to room temperature and cleaning the substrate properly. Wavy walls: panels fixed to uneven substrates telegraph every undulation – fix by furring out a level plane or choosing thicker, more rigid panels. Gaps at edges: rails set slightly out of parallel accumulate error across a run – fix by measuring each rail position individually rather than stepping off the previous one. And the quietest failure: panels intact but colour-mismatched after a re-order, because nobody archived the original batch reference. Every one of these costs more to remedy than the five minutes of prevention would have. Distributors who ship installation guides with the panels – not as a PDF on request – see claim rates drop and installer satisfaction rise, which is how a humble row of Z-clips becomes part of the product’s reputation.
Key Takeaways
- Three questions decide the fixing: reversibility, substrate reliability, installer skill.
- Z-clips repay their cost in demountability across fit-out cycles.
- Condition adhesive, clean substrates, and measure each rail individually to avoid the classic failures.
- Ship installation guides with the panels, not as a PDF on request.