
Designers spend hours on colour and minutes on edges, and the result is visible in every photograph of the finished space. A panel with a clean square edge, tight joints, and a consistent 10 mm shadow gap reads as architecture. The same panel with uneven butt joints, visible fixings, and a smear of sealant reads as a compromise. Edge detail is the cheapest quality upgrade in acoustic work, and it is almost entirely a matter of specifying it.
The four basic edge treatments
Square butt joints are the default: panels meet edge to edge, either directly or with a hairline gap. They are the cheapest to produce and the least forgiving, because any deviation in panel dimension or wall flatness shows as an inconsistent line. Bevelled edges — a small chamfer, typically 2 to 5 mm — soften the joint and deliberately create a fine shadow line that disguises minor variation. They cost a machining step and reward it in appearance.
Shiplap and v-groove profiles overlap or interlock, producing a rhythm of shadows across the wall. They suit slat systems and larger formats where the joint is a design feature rather than something to hide. Shadow gaps — a deliberate 8 to 12 mm recess between panels or at the perimeter — are the most architectural option, requiring a backing or reveal trim so the gap reads as a deliberate reveal rather than a mistake. Each option has a cost and a tolerance implication, and the tolerance implication is what most often goes unstated.
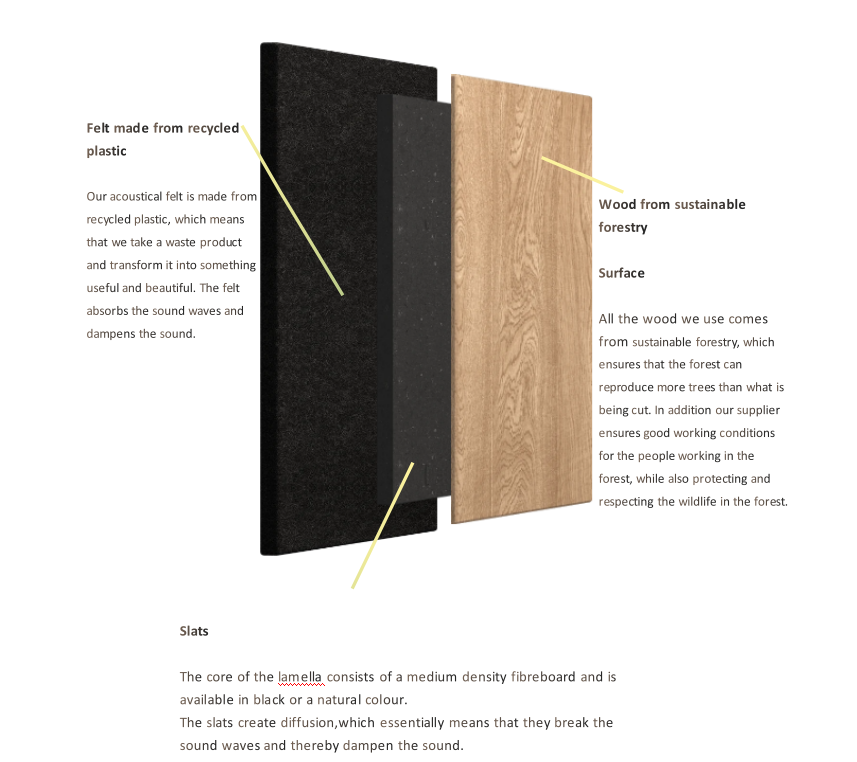
Why shadow gaps cost more than they look
A shadow gap requires three things beyond the panel itself: a dark backing so the recess reads as depth rather than as a hole into the structure, a consistent gap width around every panel and at every junction, and a perimeter detail that terminates cleanly at floors, ceilings, and openings. In practice this means either a machined rebate on the panel edge or a separate reveal trim, both of which add cost per linear metre and both of which require the installer to work to a tighter tolerance than a butt joint.
The payoff is disproportionate. A 10 mm shadow gap makes a wall of panels look like a designed surface, hides the inevitable 1 to 2 mm variation in a plastered wall, and provides a natural termination that avoids the sealant line which otherwise becomes the weakest visual element. Designers who understand this specify it early; contractors who price it late discover it costs more than the panels did.
Edge profiles and fire, cleaning, and durability
Edge detail is not purely visual. Exposed edges on felt panels can fray with handling, so a machined or heat-sealed edge improves durability in high-traffic areas. In healthcare and education, edges are where cleaning happens and where damage begins, which argues for a radiused or capped profile rather than a sharp square edge. In fire-rated assemblies, the edge treatment may affect how the panel performs at a junction, and the tested detail should be followed rather than approximated.
For slat systems, edge treatment interacts with slat spacing. A slat panel terminating with a full slat reads as finished; one terminating with a half-space requires a closing trim. Specifying the termination detail alongside the panel format avoids the site improvisation that produces the tell-tale uneven last slat.
Matching the detail to the project
Three project types, three recommendations. In corporate interiors where budgets are moderate and appearance matters, a 2 mm bevel with a consistent 3 mm joint is the best value: it softens the line without the cost of a shadow gap. In hospitality and premium retail, a 10 mm shadow gap with a dark backing is worth the premium because the wall is seen at close range and photographed. In schools, clinics, and public buildings, a square edge with a durable machined finish and minimal joint width is the practical choice, prioritising cleanability and impact resistance over visual refinement.
Whichever is chosen, specify it in the document rather than leaving it to the installer: the joint width, the tolerance, the treatment at perimeter and openings, and the fixing method that allows the joint to be achieved. Edge detail is the specification item with the highest ratio of visual impact to cost, and it is the one most frequently left to chance.
The procurement lesson
When comparing quotations for the same wall, check whether the edge treatment is the same. A price difference of ten to fifteen percent between two suppliers is often entirely explained by one quoting bevelled edges and the other quoting butt joints, or one including reveal trims and the other excluding them. Making the edge detail explicit turns an apples-to-oranges comparison into a real one — and it gives the client a visible quality outcome to judge the installation against, which is exactly what a snagging list needs.
Set-out: why the last panel is always the problem
Every panel layout has a set-out decision, and most site problems come from making it late. If a wall of 2,400 mm panels is fitted into a 7,300 mm run, three panels leave a 100 mm remainder, which must either be absorbed into the joint widths, added as a cut panel, or designed out by adjusting the module. The wrong answer is discovered on site, where the remainder becomes an uneven last panel and a visible compromise.
The correct approach is to set out from the centre, or from the most visually important corner, and distribute the remainder symmetrically. A 50 mm cut at each end reads as a deliberate margin; a 100 mm cut at one end reads as an error. This is a drawing exercise, not a site exercise, and it takes twenty minutes at design stage.
Set-out also determines where fixings fall. If a fixing must land on a stud, and the stud spacing is 600 mm while the panel module is 600 mm, the two either align neatly or fight each other for the whole wall. Coordinating panel module with structural spacing at design stage is the cheapest way to avoid a wall where half the panels are fixed into the lining rather than into structure.
For suppliers, providing a set-out drawing as part of the delivery package costs little and prevents most of the callbacks. A distributor who sends panels with a layout drawing — showing module, start point, cut allowance, and fixing positions — is effectively supplying installation quality along with the product, which is a differentiator that customers remember on the next project.

Key Takeaways
- Edge detail is the cheapest quality upgrade in acoustic work and the item most often left to the installer.
- Square joints are cheapest and least forgiving; a 2 mm bevel hides variation at modest cost; a 10 mm shadow gap is the architectural option and needs a dark backing and a reveal.
- Set out from the centre and split the remainder symmetrically — a 50 mm margin each end reads as design, a 100 mm cut at one end reads as error.
- Exposed edges fray, so machined or sealed edges matter wherever panels are handled or cleaned.
- Comparing quotations without comparing edge treatment is comparing two different products.
The broader point is that edge specification buys appearance without buying performance. A client unwilling to fund additional absorption will often fund a better edge, and the perceived improvement in quality is disproportionate to the cost — which makes it one of the few easy wins available in a value-engineering conversation.