
A slat wall is one of the most specified acoustic finishes in commercial interiors, and one of the most common sources of site rework. A drawing says “wood slat acoustic panels”; a supplier quotes a square metre rate; and panels arrive in cartons sized without reference to the column grid. On installation day the module misses the reveals, a corner needs a sliver cut nobody allowed for, and the ceiling datum is out. The standard wood slat acoustic panel dimensions 600×2400 format is a useful starting point for avoiding all of this, but only if the whole team treats it as a coordinated module rather than a catalogue phrase. None of these problems is an acoustic failure. Each is a dimensional failure that is preventable at tender stage.
This guide is for the people who carry that risk: architects setting out a feature wall, acoustic consultants coordinating a schedule, main contractors managing interfaces, distributors and procurement managers seeking comparable quotations. It explains what the 600 x 2400 module describes, how slat pitch and backing thickness affect the build-up, how to set out a wall or ceiling around it, and what to put in an RFQ. Figures here are indicative planning values, not warranties; every size, tolerance and performance figure must be confirmed in the formal quotation for your project.
Wood slat acoustic panel dimensions 600×2400: what the module describes
In supplier literature, “600×2400” normally means a 600 mm face width and 2400 mm face height. It is a nominal module, not a guaranteed finished size: the figure may refer to the backing tile, the overall panel including slat projection, or the visible face after trims. Those interpretations differ by 10-30 mm, enough to break a carefully set-out reveal. Ask the supplier to state in writing which dimension the number refers to and to provide a dimensioned cross-section and elevation before you fix a grid.
The 600 mm width persists because it divides cleanly into common ceiling grids and column spacings, and because two installers can handle a 2400 mm tall panel in most wall applications. Taller formats such as 600×2700 and 600×3000 reduce horizontal joints in double-height spaces but add weight and handling risk. A 600×2400 panel can also be rotated 90 degrees for a 2400 mm run, changing the fixing pattern and where joints fall. Decide orientation before the schedule is issued, because it drives the whole setting-out drawing.
Standard modules and how they map to real walls
No single module suits every geometry. The table gives indicative choices and where they are normally considered. Confirm availability, packing and handling limits with the supplier for your exact finish.
| Nominal module (W x H) | Typical use | Grid fit | Points to control |
|---|---|---|---|
| 600 x 2400 mm | Standard wall bays, feature walls, regular ceiling fields | Divides into 600 mm ceiling grids and most 1200 mm planning modules | Confirm whether 600 mm is the tile or face size; agree vertical joint width |
| 600 x 2700 / 600 x 3000 mm | Double-height lobbies, atria, auditorium side walls | Still grid-aligned; fewer horizontal joints | Panel weight, manual handling, delivery carton length, fixing at height |
| 400 x 2400 mm | Narrow returns, between-column infill, corridor walls | Fits tight bays without site ripping to width | More vertical joints; check slat repeat continuity across panels |
| 1200 x 2400 mm | Wide uninterrupted feature walls | Half the number of vertical joints | Heavier panels, two-person handling, flatness tolerance over a wider face |
| Cut-to-size / made-to-measure | Corners, curves, openings, non-standard grids | Set out from the architect’s control grid | Lead time, cutting charges, minimum order quantity, edge finishing |
Our wood acoustic panel category and grooved panel range show how these modules are offered, and the downloadable catalogue carries the dimensioned details used at tender stage.
Slat width, gap and backing thickness
The module is only half the story. A slat panel is a build-up: face veneer over an engineered timber core, spaced on a carrier, bonded to a felt backing. Three numbers control the result: slat face width, gap between slats, and backing thickness. Their sum sets the finished depth; their ratio sets the open area that acoustic performance depends on.

Slat pitch is the repeat distance from one slat to the next, equal to face width plus gap. Grooved and perforated timber products often use a two-number notation such as 28/4 or 40/3; the convention and units must be confirmed with the supplier, as they are not standardised across manufacturers. The key check is that the repeat divides into the 600 mm module without leaving a partial slat at the edge, or that any partial slat is detailed deliberately at both ends of the run. The indicative ranges below are planning guidance; request the actual section drawing for the finish you specify.
| Parameter | Indicative range | What it changes |
|---|---|---|
| Slat face width | Approx. 20-40 mm | Visual rhythm; wider slats read as timber, narrow slats as a fine texture |
| Open gap between slats | Approx. 10-25 mm | Open area, absorption at mid/high frequency, visibility of the backing |
| Timber core thickness | Approx. 12-18 mm MDF or equivalent | Panel rigidity, weight and fixing method |
| Face veneer | Approx. 0.5-1.0 mm engineered veneer | Grain continuity and batch colour matching |
| Felt or acoustic backing | Approx. 9-15 mm PET felt | Absorption behind the slats and overall panel depth |
| Total build-up depth | Approx. 22-35 mm, depending on the above | Reveal depth, trim selection and clearance at doors or glazing |
The build-up also affects where a panel can be used. A deeper assembly needs more reveal space and a longer fixing; a thin panel may not carry a surface-mounted service without local reinforcement. See the 28/4 grooved wood panel and the MDF-strip slat wall panel for worked examples of how slat geometry and backing are combined.
Wall versus ceiling: the fixing changes the dimension
The same 600×2400 module behaves differently on a wall and a ceiling; resolve the dimensional consequences before the schedule is frozen. On a wall, panels are bonded, clipped or fixed to battens over a substrate. Substrate flatness, batten spacing and adhesive thickness add up: a 3 mm substrate tolerance across a long wall can consume the joint allowance. Confirm substrate preparation in writing and agree who brings it within tolerance.
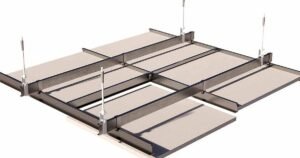
On a ceiling, weight and suspension govern. The panel plus carrier must be supported by a documented system with hangers at a stated spacing, and the module must align with the grid, lighting, sprinklers and diffusers. A ceiling set out from a wall datum without checking the grid will finish with uneven perimeter cuts. Ask for assembly weight per square metre, the suspension layout and any movement joints before committing. The grooved panel mounting clip and keel set and the keel and batten set illustrate typical installation accessories. Also confirm demountability: if services above need regular access, specify removable modules on the drawing. The application solutions overview is a useful cross-check on which surfaces should carry the acoustic area.
Setting out: turning a module into a drawing
A good setting-out drawing removes interpretation. Start from a fixed control grid, not a convenient corner, and show where the first panel lands, how joints accumulate and what happens at each termination. Work through this sequence before manufacture.
- Establish the datum: a control line for the module grid and a finished-floor or ceiling datum, both referenced to a fixed site feature.
- Locate the first module: decide whether the run starts with a full panel or a cut panel, and avoid a sliver at the most visible end.
- Distribute the tolerance: set an indicative joint width and show how any surplus is shared across joints rather than absorbed in one wide gap.
- Detail terminations: corners, reveals, door heads, glazing junctions and ceiling perimeters each need a drawn edge condition and trim.
- Coordinate services: overlay sprinklers, lights, diffusers and access panels on the module grid before issue.
- Agree a mock-up: install one full bay, including its corner or termination, and sign it off as the visual and dimensional reference.
A supplier willing to review the setting-out drawing before production is a better risk than one who only confirms the square metre quantity. If the module changes after manufacture starts, the cost falls on the project.
Cutting, waste and tolerance allowances
Even a planned grid generates offcuts. Slat panels cannot be trimmed like a plain sheet without interrupting the repeat, so cut at module boundaries wherever possible. Where a cut is unavoidable, the exposed edge needs a finished trim and the core edge should be sealed to the supplier’s instruction.
For budgeting, an indicative waste allowance of roughly 8-12% over net area is common on a regular rectangular layout; angled and diagonal layouts need more. This is planning guidance only: ask the supplier to quote against the actual setting-out drawing, and order a few spare full modules from the same batch for future repairs. Batch continuity matters for veneer tone and felt colour; a spare from the original batch is far easier to match than a replacement ordered years later.
Write the tolerance you expect into the specification: panel size, squareness, edge straightness, slat alignment and colour variation. Without a stated tolerance there is no objective basis for accepting or rejecting a delivery, and a few millimetres becomes a dispute about the whole order.
RFQ checklist for wood slat acoustic panel dimensions 600×2400
A precise enquiry gets comparable answers. Include the following and require a written response to each.
- Project location, installation height and whether the panels are wall-mounted or suspended.
- Nominal module required, the orientation, and whether “600×2400” refers to face size or overall size.
- Slat face width, gap or pitch notation, backing type and thickness, and total build-up depth.
- Setting-out drawing or grid showing joint widths, terminations and any cut panels.
- Acoustic test data for the finished construction, with test method and mounting condition stated.
- Reaction-to-fire classification for the complete assembly as installed, where required.
- Veneer or finish reference, batch-matching policy and agreed tolerance for size and colour.
- Fixing system, substrate preparation responsibility, assembly weight and corrosion rating of fixings.
- Packing method, carton dimensions, quantity per carton, leading time and spare-panel recommendation.
Send the package through the contact page, and keep the technical catalogue alongside it as the reference for standard modules and finishes. Ask for a dimensioned section and elevation with the quotation, not after the order.
Application scenarios where the module matters most
- Open-plan offices: long runs of slat ceiling or wall make joint accumulation visible; set out from a grid and distribute tolerance across the run.
- Lobbies and atria: tall modules reduce horizontal joints but increase handling and suspension risk; check delivery access and lifting method.
- Auditoria: open area and backing depth are sized for absorption; keep the acoustic and dimensional schedules consistent.
- Hospitality and retail: feature walls are photographed closely, so slat repeat, veneer matching and terminations drive acceptance.
- Education and public buildings: robustness and fire documentation matter alongside the module; confirm both before tender.
In each case the dimensional and acoustic decisions are linked: changing the gap alters open area, and increasing backing thickness changes absorption and depth. Resolve both in the same drawing set.

Common mistakes in wood slat acoustic panel dimensions 600×2400
- Assuming the number is the finished size: confirm whether 600×2400 is the tile, face or overall dimension.
- Ordering before setting out: a square metre quantity without a grid cannot prevent cut slivers at reveals.
- Ignoring the slat repeat: a pitch that does not divide into 600 mm leaves a partial slat at each panel edge.
- Leaving tolerances undefined: without written size and colour tolerances there is no objective acceptance test.
- Forgetting the services overlay: sprinklers, lights and diffusers discovered after manufacture force site cuts.
- Understating waste and spares: no spare modules from the original batch means a visible mismatch on later repairs.
- Treating wall and ceiling details as identical: the fixing, weight and access requirements are different.
Plan the module before you place the order
The reliable route is simple: define the grid, agree what 600×2400 means for your product, fix the slat pitch and backing build-up, then issue a setting-out drawing with tolerances and terminations. Ask for finished-construction acoustic data, the assembly fire classification where required, and a mock-up that includes a corner. MST Acoustics supplies wood slat, grooved and perforated timber acoustic panels with documented standard modules, and our technical team can check a setting-out drawing against the proposed construction. Request a quote with your grid and section requirements, or download the catalogue to shortlist modules and finishes. All values here are indicative planning guidance; final dimensions, tolerances, performance and commercial terms must be confirmed in the formal quotation.
Frequently asked questions
What are the standard wood slat acoustic panel dimensions 600×2400?
The phrase usually describes a nominal 600 mm wide by 2400 mm high panel. Confirm whether the supplier means the backing tile, the visible face or the overall size including trims, as these differ by 10-30 mm. Request a dimensioned section and elevation before fixing a grid; the indicative modules here are planning guidance and must be confirmed in a formal quotation.
Does the 600 mm width fit a standard ceiling grid?
In most markets 600 mm divides cleanly into lay-in ceiling grids and 1200 mm planning modules, which is why it is widely used. Confirm the actual grid and joint width, and check that the slat repeat divides into the module without leaving a partial slat at the edge. Ceiling use also needs a documented suspension system and a check on assembly weight and access.
How thick is a typical slat panel build-up?
An indicative commercial build-up is roughly 22-35 mm overall: a 12-18 mm engineered timber core with a thin veneer, spaced on a carrier, over a 9-15 mm felt backing. The exact figure depends on slat width, gap and backing. Do not design reveals or door clearances from an assumed value; take it from the supplier’s section drawing.
What waste allowance should I budget for a slat wall?
As an indicative figure, roughly 8-12% over net area is common on a regular rectangular layout; angled or diagonal layouts need more. Have the supplier quote against the setting-out drawing, keep cuts at module boundaries, and order a few spare modules from the same batch so later repairs match in veneer tone and felt colour.
Can I install the same panel on a wall and a ceiling?
The module can be the same, but the fixing cannot. Walls use adhesive, clips or battens over a prepared substrate; ceilings need a designed suspension system, checked hanger spacing, coordination with sprinklers and lighting, and usually demountable modules for access. Ask for a ceiling-specific fixing detail and the assembly weight before specifying overhead use.
Which documents should come with a 600×2400 order?
Ask for the dimensioned section and elevation, the setting-out drawing with joint and edge details, finished-construction acoustic data with test method, the reaction-to-fire classification for the assembly where required, the finish reference and batch-matching policy, agreed size and colour tolerances, the fixing schedule, and packing instructions.