
Between the factory floor and your warehouse sits an ocean, a customs desk and a thousand small opportunities for things to go wrong. The professional importers’ answer is the third-party pre-shipment inspection (PSI) — an independent check of the finished, packed goods before the balance payment is released. For acoustic panels, where color consistency and veneer quality are the classic failure points, a well-designed PSI converts quality from a hope into a documented gate. Here is how the process works and how to write a checklist that catches real problems.
When and how the inspection runs
A PSI is booked when production is at or near 100% and goods are packed, typically by agencies such as SGS, Bureau Veritas, Intertek or TÜV, for a fee of a few hundred dollars per man-day. The inspector visits the factory or warehouse, samples cartons randomly (following the AQL standard, usually Acceptable Quality Limit 2.5 for major defects), and executes the buyer’s inspection checklist. Results arrive same-day in a preliminary report, with a full photographed report within 24–48 hours. Payment terms then execute: pass and the balance is released; fail and the corrective action clock starts.

What to put on the checklist for acoustic panels
Generic checklists miss the specifics that matter for panels. A robust acoustic-panel PSI covers six areas:
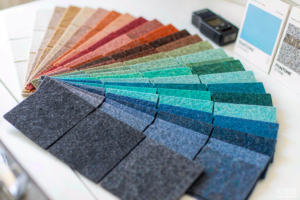
- Color and batch match. Compare production panels against the approved pre-production sample under daylight lighting — the single most valuable check for PET felt, where dye-lot drift is the classic defect.
- Dimensions and thickness. Caliper checks against spec (9/12/24mm), panel format tolerances, and squareness — thickness errors are invisible on arrival and fatal to acoustic claims.
- Veneer and surface quality (slat panels). Grain match within a panel, veneer adhesion pull-test on sampled units, scratch and dent inspection, edge sealing completeness.
- Weight and density spot checks. Panel weight correlates with density; a light batch is an early warning that the felt spec has drifted.
- Document verification. The inspector photographs certificates, checks invoice and packing list against actual carton counts, and verifies shipping marks match the booking.
- Packing condition. Moisture-barrier wrapping integrity, corner protectors present, palletizing per the agreed plan — the checks that prevent transit damage claims later.

Making the process work for both sides
A PSI only protects you if three disciplines hold. First, define defects with photos: a “minor scratch” that lives in the buyer’s imagination becomes an argument; the same scratch in a reference photo becomes a checklist row. Second, sample the right things: AQL sampling is statistical — for color match across the batch, request a full-batch color comparison rather than relying on random cartons. Third, agree the consequences in advance: the contract should state that a failed PSI triggers re-inspection at supplier cost and a defined remedy, not a negotiation.
Suppliers, for their part, should welcome inspections. A factory confident in its QC treats the PSI as free validation — and the inspection report becomes a sales asset for the next tender.
The bottom line
Pre-shipment inspection is cheap insurance on a container of acoustic panels: a few hundred dollars against tens of thousands in goods and a project schedule hanging on them. Importers who build PSI discipline into every order — with a panel-specific checklist, photographic defect definitions and contractual consequences — consistently report fewer claims, faster dispute resolution and calmer project schedules. The best time to write your checklist is before you need it; the second-best time is today.
Building a Practical Inspection Checklist
A useful pre-shipment inspection is short, repeatable, and documented. Start with identification: every pallet carries a label matching the packing list, with product code, colour, thickness, and quantity legible. Move to dimensions: sample five panels per SKU and measure length, width, and thickness against tolerance – typically plus or minus one millimetre for cut felt and half a degree on edge squareness. Then surface quality: inspect under neutral daylight conditions for fibre heterogeneity, edge fuzz, delamination in two-tone panels, and colour deviation against the retained sample. Photograph every defect with a scale reference; disputes resolve in hours when the evidence is clear, and drag for weeks when it is not.
Packaging inspection deserves equal weight, because most transit damage originates there rather than in the product. Confirm corner protection on stacked boxes, interleaving sheets between finished faces, strap tension without cutting into edges, and desiccant where the destination climate demands it. Finally, check documentation: commercial invoice, packing list, certificate of origin, and – for acoustic shipments – the fire and performance certificates that destination customs or the end client may request. One importer’s rule is worth adopting: the container should not close until the document folder is photographed beside the loaded cargo, timestamped.
When to Use Third-Party Inspection and What It Costs
Third-party inspection agencies typically charge 250 to 400 US dollars per man-day in Asian manufacturing hubs, and for a mixed acoustic shipment of one to three containers, a single-day inspection usually covers sampling, dimensional checks, and packaging review. The question is not cost but trigger: established buyers often inspect the first three orders, then move to periodic or triggered inspections – every fifth order, or any order with a new SKU or colour. This keeps supplier quality systems honest without paying for inspection on every shipment. Whichever model you choose, insist that the inspection report uses your own checklist, not the agency’s generic template, and that defect classification (critical, major, minor) is agreed before the inspector arrives, so the accept-or-reject decision at the factory is not renegotiated by email afterward.
Key Takeaways
- Inspect identification, dimensions, surface, packaging, and documents – in that order, with photographs of every defect.
- Most transit damage originates in packaging, not product.
- Third-party inspection at USD 250-400 per man-day; trigger it on first orders, new SKUs, and periodically thereafter.
- Use your own checklist and agree defect classification before the inspector arrives.
A final word on the human side of inspection, because the process works or fails there. Inspectors do better work when the factory expects them: appointments confirmed a week ahead, retained samples ready at the inspection bench, and a staff member assigned to pull the samples the checklist calls for. Buyers do better work when they read the report the same day it lands, because questions asked while the inspector still remembers the shipment cost nothing to answer. And the relationship improves when findings are shared with the factory in a spirit of process improvement rather than accusation – a defect explained by a machine setting becomes a permanent fix, while the same defect explained by a penalty becomes a negotiation. The best inspection programmes are less about catching failures than about making them structurally impossible.